Kala Soprano Banjolele
In this blog post we take a look at Kala's banjolele, officially designated the Kala KA-BNJ-BK-S. I did not dare put that full model name in the title of the post in case it frightened anyone away .
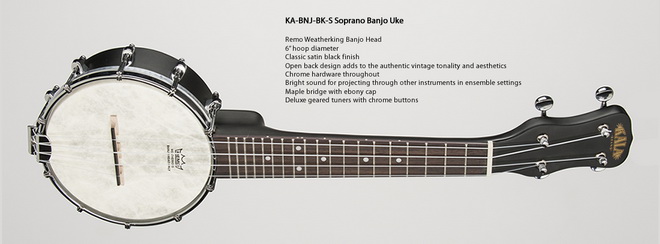
Not long after the blog started, I already wrote a post about the banjolele, but at the time I could only hope that one day I would actually get to hold one of these wonderful little instruments. In its case it looks so tiny that you might think you had picked up a ping-pong paddle with an unusually long handle. Then I was surprised by how heavy it is for its size. There is a lot of wood and metal in it, and the body really is small, so you have to hold it securely so you do not drop it. If necessary, a strap can be attached very easily, allowing it to hang from the neck or shoulder.
So I took it out of its case, gave it a good inspection and admiration, and quickly strummed it. Wow - it sounds like a banjo, yet I can actually play it!!! What should I play? It hardly matters. I started playing chords and simply could not get enough of the sound. It is loud, and eleven people out of ten would not be able to tell with their eyes closed that they were not hearing a real banjo.
I would not recommend a banjolele as a first instrument. Of course, if someone buys one anyway, they can learn to "play the ukulele" on it, but it will be harder than starting on a regular ukulele. On the other hand, if you already have a little experience, like the sound of the banjo, and enjoy songs where that characteristic country sound works well, then you NEED a banjolele.
How does it produce its sound? The strings vibrate the resonator - the large round "pancake", which may be made of several layers of skin, special plastic, and so on - and the resonator in turn vibrates the air beneath it. Because this particular banjolele (not all of them!) has an open back, those air vibrations die away quickly. So although the instrument is loud, the strummed chords do not ring for very long. You have to strum, keep rhythm and pick arpeggios very accurately and at the right tempo, because this instrument immediately exposes even the smallest slip .
When talking about the banjolele, we cannot fail to mention George Formby, one of the most famous English actors and entertainers of the first half of the twentieth century. He appeared in many films with a ukulele or banjolele under his arm, and during the Second World War he even toured the front lines, bringing a little art and entertainment to soldiers between two bursts of gunfire. Formby became so accomplished on the ukulele that the special triplet technique he perfected came to be known as the "Formby style". In essence, instead of a straightforward down-up-down-up strum, you weave an extra finger movement or two into the pattern, turning an even eighth-note rhythm into flowing triplets and giving the rhythm a colourful, delicately rolling character. YouTube is full of videos that try, with varying degrees of success, to explain the Formby style, but if there is one thing that cannot really be learned in theory - unlike, say, chord shapes - this is it. You have to practise it diligently with the instrument in your hands. The Formby style is not simply a matter of replacing even eighth notes with triplets; it is also about how the triplets are accented and how they fit into the rhythmic pattern. It is not easy! I myself only recently began studying Formby's playing - independently of the banjolele - so I would not yet dare launch into any grand explanations.
There is, however, a wonderful little song that sounds particularly good on the banjolele: Five Foot Two. There are probably ten million different versions of it, so I made the ten-million-and-first. Before recording the video I memorized the chords and tried to put something vaguely Formby-like into the strumming.
Chords:
C, E7, A7, A7, D7, G7, C | F, C (play this line twice)
E7, E7, A7, A7, D7, D7, G7, G7
There are a few little melody notes here and there, and they are not difficult to add. On A7 I fret the second fret of the A string with my ring finger; on G7 I lift my ring finger and then put it back down. On the E7 in the second line I briefly place my little finger on the fifth and then the third fret. At the end, on the G7 where there is a short pause, I put my little finger on the third fret. Happy practising!